Introduction: Why choosing the right saw really matters
Selecting the right saw for the job is the difference between clean, accurate cuts and wasted materials, frustration, and safety risks. Whether you’re cutting framing lumber, trim, metal stock, or curves in plywood, the tool you choose directly affects precision, speed, and cost.
Many beginners (and even some pros) try to use one “do-it-all” saw for everything. That usually leads to burned cuts, rough edges, dangerous kickback, and tools that wear out far too quickly. Instead, if you learn when to use a miter saw, band saw, or circular saw, you’ll:
- Work faster and more confidently
- Get cleaner, professional-looking results
- Reduce rework, tool damage, and safety incidents
This guide walks you step-by-step through how to select the right saw for your project, what each saw does best, common mistakes to avoid, and how to troubleshoot when things go wrong.
Step 1: Understand what each saw does best
Before you pick a tool, you need a clear picture of what each saw is designed for.
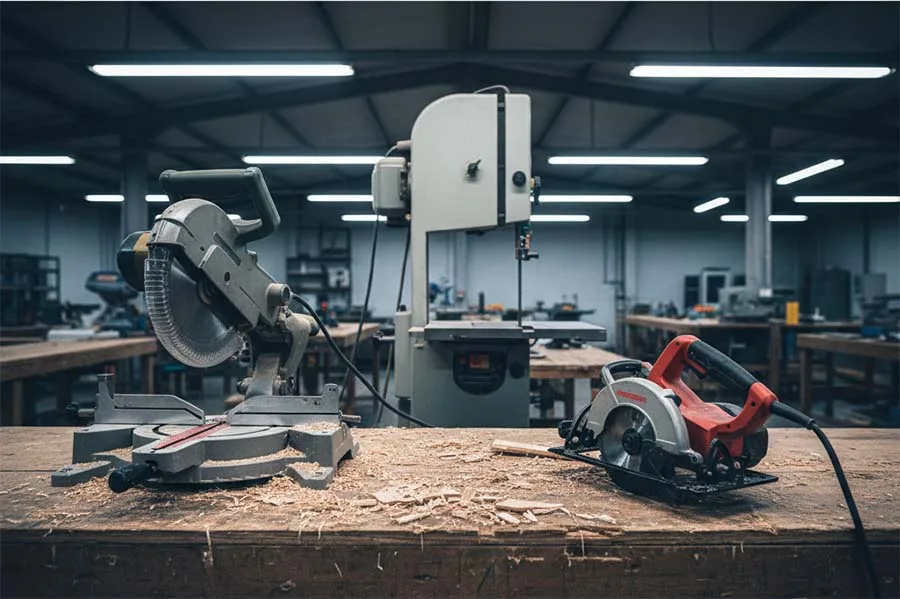
Miter saw: Precision angle and cross cuts
A miter saw is ideal when you need fast, repeatable, accurate crosscuts and angles.
- Best for:
- Crosscutting boards to length
- Angled cuts (miters) for trim, frames, molding
- Compound cuts for crown molding and complex joinery
- Strengths:
- High accuracy on angle cuts
- Clean, square crosscuts
- Great for repeat cuts with stops and supports
- Weaknesses:
- Limited to the saw’s cutting width
- Not suitable for rip cuts along board length
Use a miter saw when: You’re working on framing, trim, furniture components, or any work where precise square or angled cuts matter more than free-form shapes.
Circular saw: Versatile workhorse for straight cuts
A circular saw is a portable, highly versatile tool that excels at straight cuts in sheet goods and framing lumber.
- Best for:
- Ripping boards to width
- Cutting plywood, OSB, and sheet materials
- Rough framing and on-site cutting
- Strengths:
- Very portable
- Can rip or crosscut
- Handles large panels that won’t fit on a miter or band saw
- Weaknesses:
- Requires a guide for truly straight, accurate cuts
- More prone to kickback if misused
Use a circular saw when: You need to cut large sheets, break down materials, or work away from the workshop or bench.
Band saw: Curves, resawing, and controlled cuts
A band saw uses a continuous loop blade and excels at curved cuts and precise control.
- Best for:
- Cutting curves and irregular shapes
- Resawing thick boards into thinner pieces
- Cutting small, intricate parts
- Working with wood, some plastics, and with proper blade, some metals
- Strengths:
- Very controllable, less risk of kickback
- Narrow kerf wastes less material
- Excellent for curves and joinery cuts
- Weaknesses:
- Not ideal for perfectly straight long rips without a fence setup
- Cut quality heavily depends on blade selection and setup
Use a band saw when: You’re doing curved work, resawing, or need control over delicate cuts that other saws handle poorly.
Step 2: Define your project and material
Before choosing a saw, answer these questions:
- What material are you cutting? Wood, metal, plastic, composites all have different needs.
- Thin trim vs structural beams
- Sheet goods vs solid stock
- Softwood vs hardwood vs metal
- What type of cut do you need?
- Crosscut: across the grain or short dimension
- Rip cut: along the grain or long dimension
- Curved/irregular cut: non-straight shape
- What level of accuracy do you require?
- Rough framing vs fine furniture
- Visual surfaces vs hidden structural cuts
- Where will you work?
- Workshop with benches and stands
- Jobsite or outdoor space
- Tight spaces where portability matters
Once you have these answers, you can match the job to the appropriate saw.
Step 3: Match the saw to common project scenarios
Here’s how to select the right saw for frequent use cases.
Scenario 1: Cutting framing lumber to length
- Best choice: Miter saw or circular saw
- Why:
- Miter saw gives repeatable, square crosscuts at speed.
- Circular saw works well on-site when a miter saw isn’t available.
Decision rule:
- If you need high accuracy and repetition: choose a miter saw.
- If you need flexibility and portability: choose a circular saw.
Scenario 2: Cutting sheet goods (plywood, OSB, MDF)
- Best choice: Circular saw
- Why:
- Handles full sheets on sawhorses or the floor.
- Can rip and crosscut long panels easily with a guide.
Tip: Use a straight-edge guide or track system with your circular saw for near-cabinet-grade straight cuts.
Scenario 3: Making trim, molding, and frame cuts
- Best choice: Miter saw
- Why:
- Accurate angle control for miters and bevels.
- Clean, repeatable cuts for consistent joints.
Upgrade: A sliding compound miter saw increases cut capacity for wider boards and complex compound angles.
Scenario 4: Cutting curves and irregular shapes
- Best choice: Band saw
- Why:
- Narrow blades follow curved lines easily.
- Provides better control and safety than trying to force curves with a circular saw.
Note: For tight radii, choose a narrower band saw blade designed for curves.
Scenario 5: Resawing thick boards or cutting veneers
- Best choice: Band saw
- Why:
- Tall cutting capacity with a narrow kerf saves material.
- Better control and less waste compared with other saw types.
Lesser-known fact: A well-tuned band saw with the right blade can rival a table saw for many straight cuts, especially when resawing thick stock.
Scenario 6: General-purpose, “one saw” situations
If you can only buy one saw initially:
- Choose a circular saw if you:
- Work mostly with sheet goods and construction lumber
- Need portability and versatility
- Choose a miter saw if you:
- Focus on trim, framing, and furniture-length parts
- Value precise, repeatable crosscuts over raw versatility
As your projects grow more advanced, adding a band saw unlocks curves, resawing, and more refined work.
Step 4: Choose the right blade for each saw
Even the right saw will perform poorly with the wrong blade. Always match blade type to material and task.
Miter saw blade basics
- For construction lumber:
- Fewer teeth (e.g., 24–40T) for faster cuts
- For trim and molding:
- Higher tooth count (e.g., 60–80T) for smooth, clean edges
- For composite or plastic trim:
- Blades labeled for non-ferrous materials and plastics to prevent melting and chipping
Circular saw blade basics
- Ripping softwood:
- Fewer teeth (e.g., 18–24T) and aggressive hook angle
- Crosscutting or sheet goods:
- More teeth (e.g., 40T+), especially for plywood and laminates
- Metal cutting:
- Dedicated metal-cutting blade; never use a wood blade on metal
Interesting fact: A high-quality blade on a basic circular saw often outperforms a cheap blade on a premium saw when it comes to cut quality.
Band saw blade basics
- Width:
- Narrow blades for tight curves
- Wide blades for straight cuts and resawing
- Teeth per inch (TPI):
- Lower TPI for thick stock and faster cuts
- Higher TPI for thin material and smoother cuts
- Material:
- Wood blades for wood and some plastics
- Bi-metal blades for non-ferrous metals and tougher materials
Step 5: Common mistakes when choosing and using saws
Even experienced users fall into predictable traps. Here are the biggest ones and how to avoid them.
Mistake 1: Using one saw for everything
Problem: Forcing a circular saw to make precision trim cuts or a miter saw to handle large sheet goods leads to poor results and higher risk.
Fix: Choose the saw based on cut type and material, not convenience. If you must compromise, use guides, jigs, and supports to maximize accuracy and safety.
Mistake 2: Ignoring blade condition and type
Problem: Dull or wrong-type blades burn wood, tear fibers, and increase kickback risk.
Fix: Regularly inspect blades for dullness, missing teeth, and pitch buildup. Use the right blade for wood, metal, or composites, and clean or replace as needed.
Mistake 3: No support for long or wide material
Problem: Boards sag, bind, and twist, making cuts inaccurate and dangerous.
Fix: Use roller stands, sawhorses, or outfeed support. Always support long pieces on both infeed and outfeed sides when using a miter or circular saw.
Mistake 4: Cutting curves with the wrong saw
Problem: Trying to cut curves with a circular or miter saw is unsafe and imprecise.
Fix: Use a band saw (or jigsaw) for curves. Keep circular and miter saws for straight cuts only.
Mistake 5: Skipping test cuts
Problem: Wrong angles, poor fit, and wasted material.
Fix: Always make a test cut on scrap. Check the angle, fit, and surface quality before cutting your actual workpiece.
Troubleshooting: What to do when things go wrong
Problem: Burn marks on wood
Likely causes:
- Dull blade
- Too-slow feed rate
- Wrong blade type
Solutions:
- Replace or sharpen the blade
- Feed the material steadily without stopping mid-cut
- Use a blade designed for that specific material and cut type
Problem: Rough, chipped edges
Likely causes:
- Blade with too few teeth for the material
- Cutting from the wrong face of the board or panel
- Poor support or vibration
Solutions:
- Switch to a higher-tooth-count blade
- Cut from the show side down or up depending on saw type (e.g., circular saw usually cuts cleanest on the top face)
- Support the workpiece fully and clamp when possible
Problem: Saw binding or kicking back
Likely causes:
- Material pinching the blade
- No proper support or guide
- Forcing the saw instead of letting the blade cut
Solutions:
- Check for twists or internal stresses in the board
- Use a straight-edge guide with circular saws and a fence or miter gauge on band saws
- Maintain a firm grip, steady feed, and never stand directly in line with the blade
Problem: Cuts are not square or angles don’t match
Likely causes:
- Saw not calibrated
- Fence, table, or arm out of alignment
Solutions:
- Calibrate your saw regularly using a reliable square
- For miter saws, check both miter and bevel angles
- For band saws, ensure blade tension and tracking are correct, then square the table
Safety guidelines and best practices
Power saws are efficient, but they demand respect. Choosing the right saw also means using it in the safest possible way.
- Wear proper PPE: Safety glasses, hearing protection, and dust protection (mask or respirator) are non-negotiable.
- Read the manual: Each saw has specific safety features and procedures—blade guards, brake functions, clamps, and locking mechanisms.
- Secure your workpiece: Use clamps, fences, and supports; never hold small pieces close to the blade with your fingers.
- Keep hands away from the blade path: Plan your grip and stance before you start cutting.
- Disconnect power before adjustments: Unplug corded tools or remove batteries before changing blades or adjusting settings.
- Maintain a clean work area: Clear offcuts and debris; tripping or slipping with a live saw is extremely dangerous.
- Never defeat safety features: Don’t remove blade guards or safeties to “speed things up.” The risk is not worth it.
Choosing the Right Saw for the Job FAQ
Further Read
- Best Cordless Circular Saws Under $100
- Best Cordless Jigsaws Under $100
- Best Cordless Band Saws Under $100
- Best Cordless Miter Saws Under $100
Conclusion: Turn knowledge into cleaner, safer cuts
Choosing the right saw for the job isn’t about owning the most expensive tools; it’s about matching the saw, blade, and setup to your material and cut. When you understand the strengths of miter, band, and circular saws, you:
- Reduce waste and rework
- Increase accuracy and safety
- Work faster and with more confidence
Now it’s your turn: Try applying this guide to your next project. Before you cut, pause and ask: What material am I cutting, what shape do I need, and which saw is truly best for this?
Share your experience or questions in the comments – what saw do you rely on most, and for which jobs? If this guide helped you choose more confidently, pass it on to a colleague or friend who’s building their own toolkit or workshop.